When it comes to replacing missing teeth, dental implants are one of the most trusted and effective solutions available today. They not only restore your smile but also help maintain jawbone health and function like natural teeth. However, many patients hesitate because they aren’t sure what the procedure involves.
In this guide, we’ll walk you through the dental implant process, step by step, so you know exactly what to expect—from your initial consultation to your final smile.
Step 1: Initial Consultation and Assessment
Your journey begins with a comprehensive consultation with a qualified implant dentist. During this visit, your dental provider will:
-
Examine your teeth and gums
-
Review your medical history
-
Take X-rays or a 3D scan of your jaw
-
Discuss your treatment goals
This assessment helps determine whether you’re a good candidate for dental implants. Some patients may require additional procedures—like bone grafting—before implant placement.
If you’re looking for a reliable Etobicoke dentist, make sure to choose a professional with advanced training and experience in implant dentistry.
Step 2: Treatment Planning
Once you’re deemed a good candidate, your Etobicoke dentist will create a customized treatment plan. This plan includes:
-
The number of implants you need
-
Whether extractions or bone grafts are necessary
-
The estimated timeline for your treatment
-
Cost and financing options
Your dentist will also explain the entire process in detail and answer any questions you might have. Transparency and good communication at this stage build trust and set you up for success.
Step 3: Tooth Extraction (If Needed)
If you still have damaged or decayed teeth that need to be replaced, extractions may be necessary before implant placement. In some cases, the dental implant can be placed on the same day as the extraction. In other cases, a short healing period is recommended to allow the gum and bone to recover.
Step 4: Bone Grafting (If Required)
Bone grafting is not required for everyone, but if your jawbone is too thin or soft to support an implant, a graft may be needed. This involves adding bone material (natural or synthetic) to strengthen the area where the implant will be placed.
After bone grafting, the healing period may range from a few weeks to a few months, depending on the size of the graft.
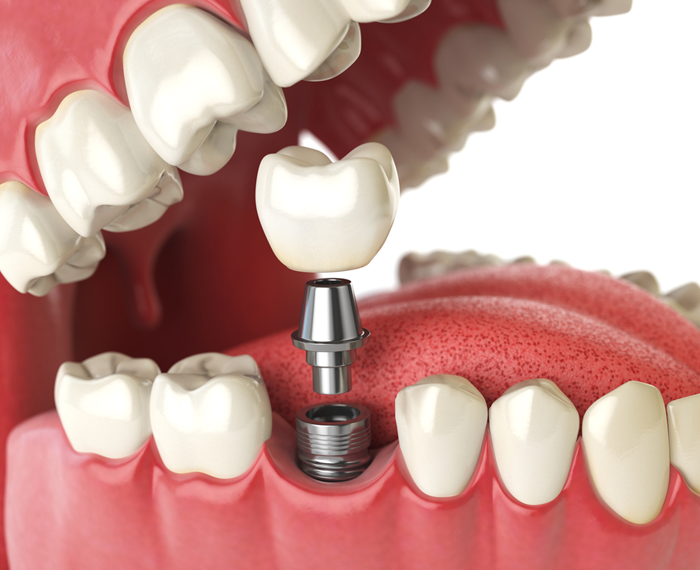
Step 5: Dental Implant Placement
Once your mouth is ready, the next step is placing the implant—a small titanium post—into your jawbone. This is done under local anesthesia or sedation to ensure comfort.
The implant acts like an artificial tooth root and is placed deep into the bone where your tooth is missing. After placement, the area is stitched up, and healing begins.
Step 6: Osseointegration (Healing Phase)
One of the most crucial steps in the dental implant process is osseointegration, which is the process where the jawbone grows around the implant and fuses with it.
This healing phase typically takes between 3 to 6 months, during which:
-
The implant becomes securely anchored in the bone
-
You may be given a temporary crown or denture
-
Follow-up appointments are scheduled to monitor healing
Patience is key here, as successful osseointegration ensures a strong and long-lasting result.
Step 7: Abutment Placement
After healing, a small connector called an abutment is attached to the implant. This piece connects the implant to the crown that will eventually be placed on top. In some cases, the abutment is placed during the initial implant surgery, but it’s often done after osseointegration.
This is a minor procedure, typically done under local anesthesia. Your gums will then need a couple of weeks to heal around the abutment before moving to the final stage.
Step 8: Final Crown Placement
Finally, a custom-made crown is crafted to match your natural teeth in shape, color, and size. Once your crown is ready, your dentist will attach it securely to the abutment.
This final crown functions just like a natural tooth—strong, durable, and visually seamless within your smile.
At this point, your implant procedure is complete, and you can enjoy the full benefits of a restored smile!
Step 9: Aftercare and Maintenance
Even though implants don’t decay, proper oral hygiene is still essential. To maintain the longevity of your implant, be sure to:
-
Brush and floss daily
-
Visit your dentist regularly for checkups
-
Avoid chewing hard items like ice or pens
-
Follow any personalized care instructions your dentist gives you
A well-maintained dental implant can last decades, often a lifetime.
If you’re considering dental implants Etobicoke patients have come to trust, it’s important to follow your dentist’s aftercare advice closely for long-term success.
Why Choose Kailash Dentistry for Your Dental Implants?
At Kailash Dentistry, we’re committed to providing personalized, compassionate care throughout your dental implant journey. We use state-of-the-art technology and proven techniques to deliver results that look and feel natural.
Whether you need a single implant or a full-mouth restoration, our team will ensure you’re comfortable and informed every step of the way. If you’re searching for a dentist near you with a focus on precision, safety, and long-term success, we’re here to help.
Final Thoughts
Dental implants offer a permanent and natural-looking solution to missing teeth. While the process involves multiple steps, the results are worth it: improved confidence, better oral health, and a strong, beautiful smile.
By understanding what to expect, you can approach your dental implant journey with confidence. Schedule your consultation with a trusted dental team today and take the first step toward a lifetime of healthy smiles.