Wallpaper can add charm and character to any room—but when it’s old, damaged, or simply no longer your style, it’s time to take it down. Whether you’re planning to paint, add new wallpaper, or just enjoy a clean surface, wallpaper removal is the essential first step.
Removing wallpaper might seem like a weekend DIY project, but it often turns into a bigger task than expected. From stubborn adhesive to fragile drywall, every step needs patience and the right approach. In this blog, we’ll walk you through everything you need to know about wallpaper removal—when to do it yourself, when to call in the pros, and how to get smooth, paint-ready walls.
Why Remove Wallpaper Instead of Painting Over It?
You might be tempted to save time by painting over wallpaper, but that often leads to more problems than it solves. Here’s why removal is usually the better option:
-
Clean Results: Paint doesn’t stick well to wallpaper seams and textures. Over time, peeling or bubbling can ruin your finish.
-
Better Surface Prep: Removing wallpaper lets you address hidden damage like mold, cracks, or holes in the wall.
-
Long-Term Solution: Proper removal gives you a smooth, fresh surface for any design changes in the future.
-
No Regrets: Painting over wallpaper can make future removal even harder. It’s best to do the job right from the start.
Types of Wallpaper and Why It Matters
Not all wallpaper is the same, and the type you have determines how hard it is to remove. Here are the common types:
-
Peel-and-Stick Wallpaper: The easiest to remove. Just peel it off in strips with minimal residue.
-
Traditional Wallpaper: Requires moisture or steam to loosen the adhesive before removal.
-
Vinyl Wallpaper: Tougher to deal with. The top layer peels off, but the backing usually sticks to the wall.
-
Textured or Fabric-Backed Wallpaper: Often more durable and more difficult to remove cleanly.
Before you begin, try peeling a small section from a corner. If it comes off easily, you’re in luck. If not, it may require soaking or steaming.
Tools You’ll Need for Wallpaper Removal
If you’re planning to tackle wallpaper removal yourself, gather the following tools:
-
Wallpaper scraper or putty knife
-
Scoring tool (for tough or vinyl paper)
-
Spray bottle with warm water or wallpaper remover solution
-
Sponge or cloth
-
Drop cloths or plastic sheets to protect floors
-
Bucket and mild soap for cleaning adhesive residue
Optional: A wallpaper steamer, which is especially helpful for stubborn areas.
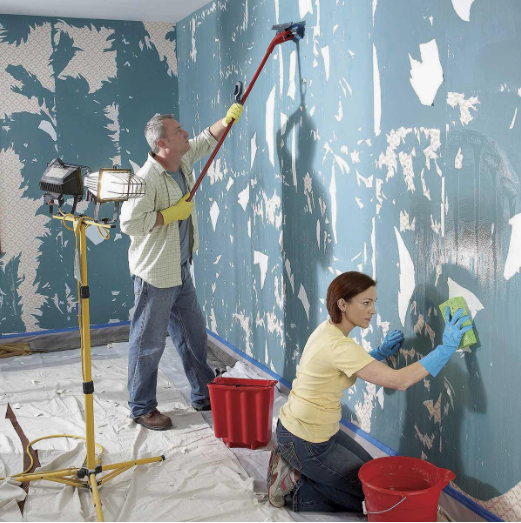
Step-by-Step Wallpaper Removal Guide
1. Prepare the Room
Start by removing furniture or pushing it to the center of the room. Cover floors and outlets with plastic sheets or drop cloths. Turn off the power if you’ll be using water near switches or sockets.
2. Test a Small Section
Try peeling the wallpaper by hand. If it lifts easily and the adhesive comes with it, you can proceed. If not, you’ll need to wet and scrape it.
3. Score the Wallpaper
Use a scoring tool to make small holes in the wallpaper. This helps moisture get behind the wallpaper and dissolve the adhesive.
4. Apply Water or Remover
Spray warm water or wallpaper remover solution over a small section. Let it soak for 10–15 minutes. Don’t rush—soaking is the key to easier scraping.
5. Start Scraping
Use a putty knife or scraper to gently lift the paper. Work slowly to avoid damaging the drywall underneath.
6. Clean Off Residue
Once the paper is removed, you’ll likely see leftover glue. Use warm soapy water or a solution of vinegar and water to scrub the wall clean.
7. Let It Dry and Inspect
After the wall is clean, let it dry completely. Check for damage like gouges or peeling drywall. These can be repaired with joint compound and sanded smooth before painting or wallpapering again.
When to Hire a Professional
While DIY wallpaper removal is possible, there are times when hiring a professional is the better route:
-
Large Areas: If you’re dealing with multiple rooms or high ceilings, pros can save you time and hassle.
-
Delicate Walls: Older homes may have thin drywall or plaster that damages easily.
-
Stubborn Wallpaper: If the wallpaper was applied incorrectly or multiple layers were used, it can be a nightmare to remove on your own.
-
Speed and Safety: Professionals have the right tools, techniques, and insurance in case anything goes wrong.
Hiring a wallpaper removal expert ensures the job is done right, especially if you’re prepping for resale or a full renovation.
Preparing for Your New Wall Finish
Once your walls are clean and dry, you’re ready for the fun part—choosing a new look. Whether it’s fresh paint, a bold accent wall, or even new wallpaper, a properly prepared wall makes all the difference in achieving a professional finish.
Before applying any paint or primer:
-
Sand any rough spots
-
Fill holes or gouges with spackle or joint compound
-
Prime the walls, especially if there was any adhesive residue
Tips to Make Wallpaper Removal Easier
-
Work in small sections—don’t try to rush through the whole wall at once.
-
Keep your tools sharp and clean to avoid damaging the wall.
-
Use gloves and proper ventilation if you’re using chemical solutions.
-
Be patient. Sometimes it takes a few rounds of soaking to loosen everything.
-
Have a trash bag or box nearby for easy cleanup as you go.
Final Thoughts
Wallpaper removal is a satisfying project that brings you one step closer to transforming your space. With the right tools, techniques, and patience, you can clear away decades of wallpaper and create a smooth, modern canvas for your next design idea.
Whether you go the DIY route or choose to work with professionals, the result is always worth it—a fresh, clean wall ready for a new beginning.