In QuickBooks, the company file is the central repository that stores all your financial transactions, settings, and other critical data.
Regularly backing up this file ensures that you can restore your data in the event of an emergency, minimizing the impact on your business operations.
By understanding the importance of company file backups and learning the steps to create a company file backup in QB, you can ensure the long-term preservation and protection of your financial data.
Step-by-step guide to creating a company file backup in QuickBooks
Follow the below steps to create a company file backup in QB.
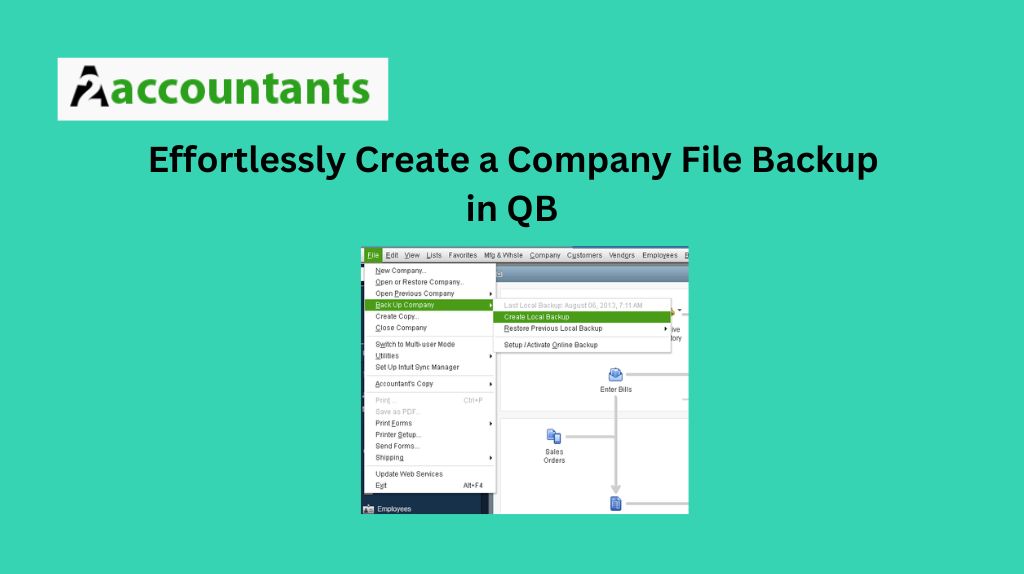
- Open QuickBooks: Start by launching the QuickBooks software on your computer.
- Navigate to the Backup Company File option: In the QuickBooks menu, locate the “File” option and then select “Backup Company” from the dropdown menu.
- Choose the backup location: When the “Backup Company File” window appears, you’ll be prompted to select a location where you want to save the backup file. This can be a local hard drive, an external storage device, or a cloud-based storage service like Dropbox or Google Drive.
- Customize the backup settings: QuickBooks will provide you with several options for customizing the backup process. You can choose to perform a full backup, which will create a complete copy of your company file, or an incremental backup, which will only backup the changes since the last backup. Additionally, you can set a schedule for automatic backups to ensure that your data is consistently protected.
- Initiate the backup process: Once you’ve selected the backup location and customized the settings, click the “OK” button to start the backup process. QuickBooks will begin creating a copy of your company file, which may take some time, depending on the size of your data.
- Verify the backup: After the backup is complete, it’s a good practice to verify that the backup file was created successfully. You can do this by navigating to the backup location and checking the file size or opening the backup file to ensure that the data is intact.
Best practices for managing and organizing your company file backups
Effective management and organization of your company file backups are crucial for ensuring their long-term viability and accessibility. Here are some best practices to consider:
- Maintain a backup schedule: Establish a regular backup schedule, such as daily, weekly, or monthly, depending on the frequency of changes in your financial data. This will help you create a comprehensive record of your company’s financial history and minimize the risk of data loss.
- Use multiple backup locations: Store your company file backups in multiple locations, such as an external hard drive, a cloud-based storage service, and a secure off-site location. This redundancy will protect your data in the event of a natural disaster, hardware failure, or other catastrophic events.
- Label and organize your backups: Clearly label each backup file with the date, time, and any relevant information, such as the version of QuickBooks used or any significant changes made to your company file. This will help you quickly identify and access the correct backup when needed.
- Test your backups regularly: Periodically restore your company file backups to ensure that the data is intact and that the restoration process works as expected. This will help you identify and address any issues with your backup strategy before an emergency arises.
- Implement security measures: Protect your company file backups with strong passwords or encryption to prevent unauthorized access or tampering. This will safeguard your sensitive financial information and maintain the integrity of your data.
Restoring a company file backup in QuickBooks
In the event of a data loss, system failure, or issues such as “This Company File Needs to Be Updated,” you may need to restore your company file backup to recover your financial information. Here’s a step-by-step guide to the restoration process:
- Open QuickBooks: Start by launching the QuickBooks software on your computer.
- Navigate to the Restore Company option: In the QuickBooks menu, locate the “File” option and then select “Restore Company” from the dropdown menu.
- Select the backup file: In the “Restore Company” window, click the “Browse” button to navigate to the location of your company file backup. Select the appropriate backup file and click “Open.”
- Choose the restore location: QuickBooks will prompt you to select the location where you want to restore the company file. This can be the original location or a new location on your computer or network.
- Initiate the restore process: Once you’ve selected the restore location, click the “Next” button to begin the restoration process. QuickBooks will start copying the backup data to the specified location, which may take some time, depending on the size of the file.
- Verify the restored data: After the restoration is complete, it’s important to verify that all your financial data has been successfully recovered. Check your transactions, settings, and other critical information to ensure that the restored company file is accurate and up-to-date.
Automating company file backups in QuickBooks
QuickBooks’ automatic backup feature allows you to schedule regular backups without the need for manual intervention, providing an additional layer of data security.
To configure automatic backups in QuickBooks:
- Open the Backup Options: In the QuickBooks menu, navigate to “Edit” > “Preferences” > “Backup” > “Company Preferences.”
- Enable automatic backups: In the “Backup Options” window, check the box labeled “Automatically back up company file.”
- Set the backup schedule: Customize the backup schedule by selecting the desired frequency (daily, weekly, or monthly) and the specific time of day when the backup should occur.
- Choose the backup location: Specify the location where you want the backup files to be saved, such as a local hard drive, an external storage device, or a cloud-based storage service.
- Configure additional settings: Depending on your needs, you can further customize the backup settings, such as the number of backup versions to retain, the file naming convention, and whether to create full or incremental backups.
By automating your company file backups, you can ensure that your financial data is regularly and consistently protected, even during periods of high activity or when you’re away from your business.
Conclusion
Maintaining the integrity and security of your financial data is crucial for the success and longevity of your business.
By understanding the importance of company file backups in QuickBooks and following a systematic approach, you can create a company file backup in QB to safeguard your financial information and minimize the impact of unexpected events.
